Showing posts with label PhotoShop. Show all posts

Monday, August 17, 2009

Mosaic


This month, I'm answering reader questions for Corel Painter magazine, Issue 35, and the editor was kind enough to send me the commission early so I'll be through (knock wood) before we leave for Florida. One question was on how to make mosaics in Painter.

I love doing mosaics in real life as well as in Painter; they're both relaxing and seriously therapeutic. This day has been long, though; my brain is tired, and my blog will be short this time. I think I'll go try to find a good movie on NetFlix. You can bet good money there's nothing on Dish.
See ya later.

Sunday, July 19, 2009

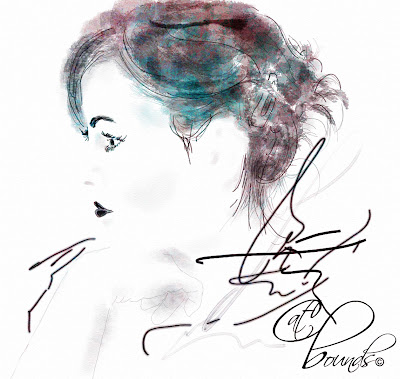
Self Portrait quick tutorial


(Click on the image to zoom in)
Here's a quickie self-portrait I did in PhotoShop this afternoon.....well, yes, it began with a photo of me, and yes, I took some liberties. I've told online friends that I'll never grow old to them as long as I can still manage PhotoShop. No, you may not see the original photo......It would spoil the illusion. I like this technique, and I'll try some more, maybe not so stern looking portraits. Actually, it looks more like my Aunt Lee, but my mom has always gotten us mixed up, so I guess it's okay.

Open a photo in PhotoShop, desaturate it, and you may need to raise the contrast a bit in order to bring out the shadow areas. If you also own Corel Painter, you may not use the brushes in PhotoShop very often, but there are some pretty nifty ones in there. Create you first transparent layer above the canvas and begin tracing in gestural strokes. Just try for the essence of the image; leave something to the imagination. Most of the outlining I did with a small Retouch brush, working in a total of 18 layers. I like to work like that because it allows a lot of freedom for changing Opacity and Blending Modes. The painterly looking strokes in shading and in the hair were done using various David Nagel brushes, which are some of my absolute favorites. Google Nagel brushes to find them for free download.

When it's looking like you want it, add a layer of painted texture, maybe a painting you've done earlier, or one you downloaded from a stock photo site. Then begin to play with Blending Modes. I used Softlight. You may also need to move the painted texture layer around to position the colours where they look best. Finally, I added Sandstone texture twice at 50% and 65% consecutively, fading both to 49%. It just looks better that way. That's a really abbreviated tutorial. If you have questions, just ask. You know I love to talk. See ya later!

Tuesday, July 7, 2009

mural


I got word today that the mural is hung, but when I was painting the panels on my computer, I envisioned it being hung in the entrance to the Rainbow Casino in Vicksburg, MS, and that someone involved with it would send me photos of the finished piece. Turns out, it was hung in the gaming area, which operates 24/7, and no photos are allowed there. So, I'll post some of the 12 panels here, and Jim & I are headed down to Vicksburg Thursday, just want to see it for myself.

They had a certain look in mind, but otherwise I was given fairly free rein, using the reference photos (taken by renowned photographer Jack Robinson) of vintage roadside scenes along the highway heading into Vicksburg. At one point, though, I thought that it needed some cotton bolls and cotton fields, which to me represent the rural South back in the day. I was informed, in no uncertain terms, that there would be no cotton in any of these images! I guess cotton means different things to different folks............. I worked on it, off and on, for about 6 months, and now that it's done, I would like to start over and do some things differently, but that's how I feel about most everything I paint. The mural is said to be 96 feet long and 8 feet high. Each of the files is huge, the largest one being 250 MB, which is bigger than the hard drive on my first computer, but I've whacked 'em way down to post here, and for now they'll have to do, until I can figure out a way to get photos of the mural.................

Sunday, June 28, 2009

Buzz Pro


Here are some Day Lilies in my yard (They've been gorgeous this year, bursting out all over) and bird cages I've collected that are currently living on my screened-in deck (just the cages, no birds). I was playing around with the Buzz Pro filter on them. I've been using Buzz Pro for preliminary prep of photos for years; I love how it creates a look that's beautiful enough to sign and hang or serves as the beginning for a brush painting, and I was soooo disappointed when I learned that the company who created it, Fo2Pix, had closed up shop. Then I discovered that an artist friend of mine, Stephen LeQuier, has their final version, v3, on his site as a free download! http://asnailpace.com/blog/buzz-pro-v30/

Stephen (Trimoon in the forums) does both beautiful photography and digital art, and he offers his tutorials for sale. If you go there to download Buzz Pro, be sure and spend some time looking at all he has to offer. I use Buzz Pro as a PhotoShop filter, but I think it works in several other photo editing programs. It works especially well on nature photos, and it's also a good way to salvage photos that didn't quite develop the way you wanted them to, just turn 'em into art.

Today I added music to my Blog (thanks, Bev). If you'd rather not listen, just click it off. It has been a restful Sunday. I'm enjoying blogging for the moment, a different focus, and now I think I'll go work on a crossword puzzle. They seem to sharpen my thinking.
http://www.crossword-puzzles.co.uk/